Author: Jason Brownlee
Object detection is a task in computer vision that involves identifying the presence, location, and type of one or more objects in a given photograph.
It is a challenging problem that involves building upon methods for object recognition (e.g. where are they), object localization (e.g. what are their extent), and object classification (e.g. what are they).
In recent years, deep learning techniques have achieved state-of-the-art results for object detection, such as on standard benchmark datasets and in computer vision competitions. Most notably is the R-CNN, or Region-Based Convolutional Neural Networks, and the most recent technique called Mask R-CNN that is capable of achieving state-of-the-art results on a range of object detection tasks.
In this tutorial, you will discover how to use the Mask R-CNN model to detect objects in new photographs.
After completing this tutorial, you will know:
- The region-based Convolutional Neural Network family of models for object detection and the most recent variation called Mask R-CNN.
- The best-of-breed open source library implementation of the Mask R-CNN for the Keras deep learning library.
- How to use a pre-trained Mask R-CNN to perform object localization and detection on new photographs.
Let’s get started.

How to Perform Object Detection in Photographs With Mask R-CNN in Keras
Photo by Ole Husby, some rights reserved.
Tutorial Overview
This tutorial is divided into three parts; they are:
- R-CNN and Mask R-CNN
- Matterport Mask R-CNN Project
- Object Detection with Mask R-CNN
Want Results with Deep Learning for Computer Vision?
Take my free 7-day email crash course now (with sample code).
Click to sign-up and also get a free PDF Ebook version of the course.
Mask R-CNN for Object Detection
Object detection is a computer vision task that involves both localizing one or more objects within an image and classifying each object in the image.
It is a challenging computer vision task that requires both successful object localization in order to locate and draw a bounding box around each object in an image, and object classification to predict the correct class of object that was localized.
An extension of object detection involves marking the specific pixels in the image that belong to each detected object instead of using coarse bounding boxes during object localization. This harder version of the problem is generally referred to as object segmentation or semantic segmentation.
The Region-Based Convolutional Neural Network, or R-CNN, is a family of convolutional neural network models designed for object detection, developed by Ross Girshick, et al.
There are perhaps four main variations of the approach, resulting in the current pinnacle called Mask R-CNN. The salient aspects of each variation can be summarized as follows:
- R-CNN: Bounding boxes are proposed by the “selective search” algorithm, each of which is stretched and features are extracted via a deep convolutional neural network, such as AlexNet, before a final set of object classifications are made with linear SVMs.
- Fast R-CNN: Simplified design with a single model, bounding boxes are still specified as input, but a region-of-interest pooling layer is used after the deep CNN to consolidate regions and the model predicts both class labels and regions of interest directly.
- Faster R-CNN: Addition of a Region Proposal Network that interprets features extracted from the deep CNN and learns to propose regions-of-interest directly.
- Mask R-CNN: Extension of Faster R-CNN that adds an output model for predicting a mask for each detected object.
The Mask R-CNN model introduced in the 2018 paper titled “Mask R-CNN” is the most recent variation of the family models and supports both object detection and object segmentation. The paper provides a nice summary of the model linage to that point:
The Region-based CNN (R-CNN) approach to bounding-box object detection is to attend to a manageable number of candidate object regions and evaluate convolutional networks independently on each RoI. R-CNN was extended to allow attending to RoIs on feature maps using RoIPool, leading to fast speed and better accuracy. Faster R-CNN advanced this stream by learning the attention mechanism with a Region Proposal Network (RPN). Faster R-CNN is flexible and robust to many follow-up improvements, and is the current leading framework in several benchmarks.
— Mask R-CNN, 2018.
The family of methods may be among the most effective for object detection, achieving then state-of-the-art results on computer vision benchmark datasets. Although accurate, the models can be slow when making a prediction as compared to alternate models such as YOLO that may be less accurate but are designed for real-time prediction.
Matterport Mask R-CNN Project
Mask R-CNN is a sophisticated model to implement, especially as compared to a simple or even state-of-the-art deep convolutional neural network model.
Source code is available for each version of the R-CNN model, provided in separate GitHub repositories with prototype models based on the Caffe deep learning framework. For example:
- R-CNN: Regions with Convolutional Neural Network Features, GitHub.
- Fast R-CNN, GitHub.
- Faster R-CNN Python Code, GitHub.
- Detectron, Facebook AI, GitHub.
Instead of developing an implementation of the R-CNN or Mask R-CNN model from scratch, we can use a reliable third-party implementation built on top of the Keras deep learning framework.
The best of breed third-party implementations of Mask R-CNN is the Mask R-CNN Project developed by Matterport. The project is open source released under a permissive license (i.e. MIT license) and the code has been widely used on a variety of projects and Kaggle competitions.
Nevertheless, it is an open source project, subject to the whims of the project developers. As such, I have a fork of the project available, just in case there are major changes to the API in the future.
The project is light on API documentation, although it does provide a number of examples in the form of Python Notebooks that you can use to understand how to use the library by example. Two notebooks that may be helpful to review are:
There are perhaps three main use cases for using the Mask R-CNN model with the Matterport library; they are:
- Object Detection Application: Use a pre-trained model for object detection on new images.
- New Model via Transfer Learning: Use a pre-trained model as a starting point in developing a model for a new object detection dataset.
- New Model from Scratch: Develop a new model from scratch for an object detection dataset.
In order to get familiar with the model and the library, we will look at the first example in the next section.
Object Detection With Mask R-CNN
In this section, we will use the Matterport Mask R-CNN library to perform object detection on arbitrary photographs.
Much like using a pre-trained deep CNN for image classification, e.g. such as VGG-16 trained on an ImageNet dataset, we can use a pre-trained Mask R-CNN model to detect objects in new photographs. In this case, we will use a Mask R-CNN trained on the MS COCO object detection problem.
Mask R-CNN Installation
The first step is to install the library.
At the time of writing, there is no distributed version of the library, so we have to install it manually. The good news is that this is very easy.
Installation involves cloning the GitHub repository and running the installation script on your workstation. If you are having trouble, see the installation instructions buried in the library’s readme file.
Step 1. Clone the Mask R-CNN GitHub Repository
This is as simple as running the following command from your command line:
git clone https://github.com/matterport/Mask_RCNN.git
This will create a new local directory with the name Mask_RCNN that looks as follows:
Mask_RCNN
├── assets
├── build
│   ├── bdist.macosx-10.13-x86_64
│   └── lib
│       └── mrcnn
├── dist
├── images
├── mask_rcnn.egg-info
├── mrcnn
└── samples
    ├── balloon
    ├── coco
    ├── nucleus
    └── shapes
Step 2. Install the Mask R-CNN Library
The library can be installed directly via pip.
Change directory into the Mask_RCNN directory and run the installation script.
From the command line, type the following:
cd Mask_RCNN
python setup.py install
On Linux or MacOS you may need to install the software with sudo permissions; for example, you may see an error such as:
error: can't create or remove files in install directory
In that case, install the software with sudo:
sudo python setup.py install
The library will then install directly and you will see a lot of successful installation messages ending with the following:
...
Finished processing dependencies for mask-rcnn==2.1
This confirms that you installed the library successfully and that you have the latest version, which at the time of writing is version 2.1.
Step 3: Confirm the Library Was Installed
It is always a good idea to confirm that the library was installed correctly.
You can confirm that the library was installed correctly by querying it via the pip command; for example:
pip show mask-rcnn
You should see output informing you of the version and installation location; for example:
Name: mask-rcnn
Version: 2.1
Summary: Mask R-CNN for object detection and instance segmentation
Home-page: https://github.com/matterport/Mask_RCNN
Author: Matterport
Author-email: waleed.abdulla@gmail.com
License: MIT
Location: ...
Requires:
Required-by:
We are now ready to use the library.
Example of Object Localization
We are going to use a pre-trained Mask R-CNN model to detect objects on a new photograph.
Step 1. Download Model Weights
First, download the weights for the pre-trained model, specifically a Mask R-CNN trained on the MS Coco dataset.
The weights are available from the project GitHub project and the file is about 250 megabytes. Download the model weights to a file with the name ‘mask_rcnn_coco.h5‘ in your current working directory.
- Download Weights (mask_rcnn_coco.h5) (246 megabytes)
Step 2. Download Sample Photograph
We also need a photograph in which to detect objects.
We will use a photograph from Flickr released under a permissive license, specifically a photograph of an elephant taken by Mandy Goldberg.
Download the photograph to your current working directory with the filename ‘elephant.jpg‘.

Elephant (elephant.jpg)
Taken by Mandy Goldberg, some rights reserved.
Step 3. Load Model and Make Prediction
First, the model must be defined via an instance MaskRCNN class.
This class requires a configuration object as a parameter. The configuration object defines how the model might be used during training or inference.
In this case, the configuration will only specify the number of images per batch, which will be one, and the number of classes to predict.
You can see the full extent of the configuration object and the properties that you can override in the config.py file.
# define the test configuration
class TestConfig(Config):
     NAME = "test"
     GPU_COUNT = 1
     IMAGES_PER_GPU = 1
     NUM_CLASSES = 1 + 80
We can now define the MaskRCNN instance.
We will define the model as type “inference” indicating that we are interested in making predictions and not training. We must also specify a directory where any log messages could be written, which in this case will be the current working directory.
# define the model
rcnn = MaskRCNN(mode='inference', model_dir='./', config=TestConfig())
The next step is to load the weights that we downloaded.
# load coco model weights
rcnn.load_weights('mask_rcnn_coco.h5', by_name=True)
Now we can make a prediction for our image. First, we can load the image and convert it to a NumPy array.
# load photograph
img = load_img('elephant.jpg')
img = img_to_array(img)
We can then make a prediction with the model. Instead of calling predict() as we would on a normal Keras model, will call the detect() function and pass it the single image.
# make prediction
results = rcnn.detect([img], verbose=0)
The result contains a dictionary for each image that we passed into the detect() function, in this case, a list of a single dictionary for the one image.
The dictionary has keys for the bounding boxes, masks, and so on, and each key points to a list for multiple possible objects detected in the image.
The keys of the dictionary of note are as follows:
- ‘rois‘: The bound boxes or regions-of-interest (ROI) for detected objects.
- ‘masks‘: The masks for the detected objects.
- ‘class_ids‘: The class integers for the detected objects.
- ‘scores‘: The probability or confidence for each predicted class.
We can draw each box detected in the image by first getting the dictionary for the first image (e.g. results[0]), and then retrieving the list of bounding boxes (e.g. [‘rois’]).
boxes = results[0]['rois']
Each bounding box is defined in terms of the bottom left and top right coordinates of the bounding box in the image
y1, x1, y2, x2 = boxes[0]
We can use these coordinates to create a Rectangle() from the matplotlib API and draw each rectangle over the top of our image.
# get coordinates
y1, x1, y2, x2 = box
# calculate width and height of the box
width, height = x2 - x1, y2 - y1
# create the shape
rect = Rectangle((x1, y1), width, height, fill=False, color='red')
# draw the box
ax.add_patch(rect)
To keep things neat, we can create a function to do this that will take the filename of the photograph and the list of bounding boxes to draw and will show the photo with the boxes.
# draw an image with detected objects
def draw_image_with_boxes(filename, boxes_list):
     # load the image
     data = pyplot.imread(filename)
     # plot the image
     pyplot.imshow(data)
     # get the context for drawing boxes
     ax = pyplot.gca()
     # plot each box
     for box in boxes_list:
          # get coordinates
          y1, x1, y2, x2 = box
          # calculate width and height of the box
          width, height = x2 - x1, y2 - y1
          # create the shape
          rect = Rectangle((x1, y1), width, height, fill=False, color='red')
          # draw the box
          ax.add_patch(rect)
     # show the plot
     pyplot.show()
We can now tie all of this together and load the pre-trained model and use it to detect objects in our photograph of an elephant, then draw the photograph with all detected objects.
The complete example is listed below.
# example of inference with a pre-trained coco model
from keras.preprocessing.image import load_img
from keras.preprocessing.image import img_to_array
from mrcnn.config import Config
from mrcnn.model import MaskRCNN
from matplotlib import pyplot
from matplotlib.patches import Rectangle

# draw an image with detected objects
def draw_image_with_boxes(filename, boxes_list):
     # load the image
     data = pyplot.imread(filename)
     # plot the image
     pyplot.imshow(data)
     # get the context for drawing boxes
     ax = pyplot.gca()
     # plot each box
     for box in boxes_list:
          # get coordinates
          y1, x1, y2, x2 = box
          # calculate width and height of the box
          width, height = x2 - x1, y2 - y1
          # create the shape
          rect = Rectangle((x1, y1), width, height, fill=False, color='red')
          # draw the box
          ax.add_patch(rect)
     # show the plot
     pyplot.show()

# define the test configuration
class TestConfig(Config):
     NAME = "test"
     GPU_COUNT = 1
     IMAGES_PER_GPU = 1
     NUM_CLASSES = 1 + 80

# define the model
rcnn = MaskRCNN(mode='inference', model_dir='./', config=TestConfig())
# load coco model weights
rcnn.load_weights('mask_rcnn_coco.h5', by_name=True)
# load photograph
img = load_img('elephant.jpg')
img = img_to_array(img)
# make prediction
results = rcnn.detect([img], verbose=0)
# visualize the results
draw_image_with_boxes('elephant.jpg', results[0]['rois'])
Running the example loads the model and performs object detection. More accurately, we have performed object localization, only drawing bounding boxes around detected objects.
In this case, we can see that the model has correctly located the single object in the photo, the elephant, and drawn a red box around it.
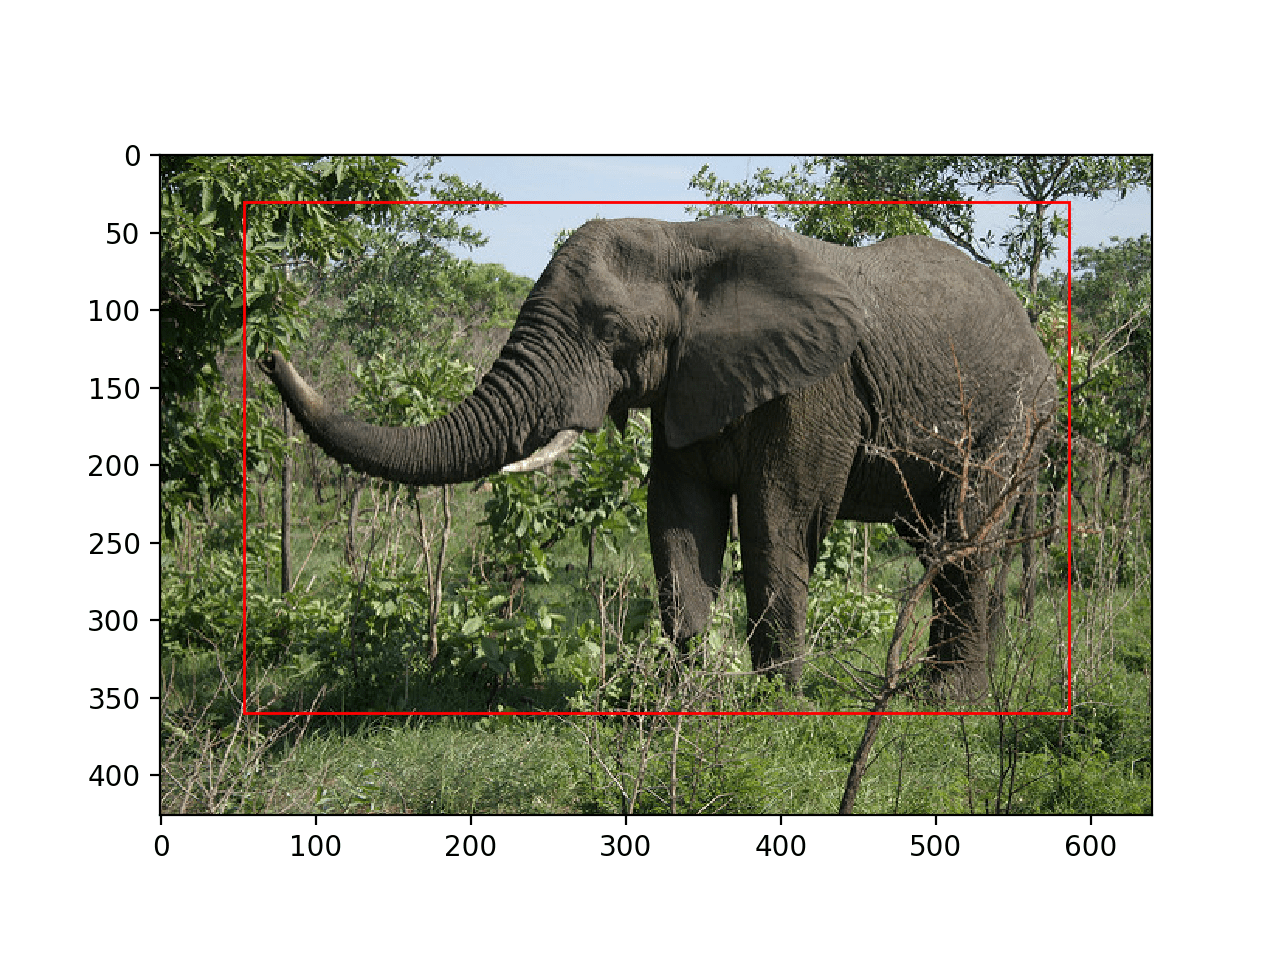
Photograph of an Elephant With All Objects Localized With a Bounding Box
Example of Object Detection
Now that we know how to load the model and use it to make a prediction, let’s update the example to perform real object detection.
That is, in addition to localizing objects, we want to know what they are.
The Mask_RCNN API provides a function called display_instances() that will take the array of pixel values for the loaded image and the aspects of the prediction dictionary, such as the bounding boxes, scores, and class labels, and will plot the photo with all of these annotations.
One of the arguments is the list of predicted class identifiers available in the ‘class_ids‘ key of the dictionary. The function also needs a mapping of ids to class labels. The pre-trained model was fit with a dataset that had 80 (81 including background) class labels, helpfully provided as a list in the Mask R-CNN Demo, Notebook Tutorial, listed below.
# define 81 classes that the coco model knowns about
class_names = ['BG', 'person', 'bicycle', 'car', 'motorcycle', 'airplane',
               'bus', 'train', 'truck', 'boat', 'traffic light',
               'fire hydrant', 'stop sign', 'parking meter', 'bench', 'bird',
               'cat', 'dog', 'horse', 'sheep', 'cow', 'elephant', 'bear',
               'zebra', 'giraffe', 'backpack', 'umbrella', 'handbag', 'tie',
               'suitcase', 'frisbee', 'skis', 'snowboard', 'sports ball',
               'kite', 'baseball bat', 'baseball glove', 'skateboard',
               'surfboard', 'tennis racket', 'bottle', 'wine glass', 'cup',
               'fork', 'knife', 'spoon', 'bowl', 'banana', 'apple',
               'sandwich', 'orange', 'broccoli', 'carrot', 'hot dog', 'pizza',
               'donut', 'cake', 'chair', 'couch', 'potted plant', 'bed',
               'dining table', 'toilet', 'tv', 'laptop', 'mouse', 'remote',
               'keyboard', 'cell phone', 'microwave', 'oven', 'toaster',
               'sink', 'refrigerator', 'book', 'clock', 'vase', 'scissors',
               'teddy bear', 'hair drier', 'toothbrush']
We can then provide the details of the prediction for the elephant photo to the display_instances() function; for example:
# get dictionary for first prediction
r = results[0]
# show photo with bounding boxes, masks, class labels and scores
display_instances(img, r['rois'], r['masks'], r['class_ids'], class_names, r['scores'])
The display_instances() function is flexible, allowing you to only draw the mask or only the bounding boxes. You can learn more about this function in the visualize.py source file.
The complete example with this change using the display_instances() function is listed below.
# example of inference with a pre-trained coco model
from keras.preprocessing.image import load_img
from keras.preprocessing.image import img_to_array
from mrcnn.visualize import display_instances
from mrcnn.config import Config
from mrcnn.model import MaskRCNN

# define 81 classes that the coco model knowns about
class_names = ['BG', 'person', 'bicycle', 'car', 'motorcycle', 'airplane',
               'bus', 'train', 'truck', 'boat', 'traffic light',
               'fire hydrant', 'stop sign', 'parking meter', 'bench', 'bird',
               'cat', 'dog', 'horse', 'sheep', 'cow', 'elephant', 'bear',
               'zebra', 'giraffe', 'backpack', 'umbrella', 'handbag', 'tie',
               'suitcase', 'frisbee', 'skis', 'snowboard', 'sports ball',
               'kite', 'baseball bat', 'baseball glove', 'skateboard',
               'surfboard', 'tennis racket', 'bottle', 'wine glass', 'cup',
               'fork', 'knife', 'spoon', 'bowl', 'banana', 'apple',
               'sandwich', 'orange', 'broccoli', 'carrot', 'hot dog', 'pizza',
               'donut', 'cake', 'chair', 'couch', 'potted plant', 'bed',
               'dining table', 'toilet', 'tv', 'laptop', 'mouse', 'remote',
               'keyboard', 'cell phone', 'microwave', 'oven', 'toaster',
               'sink', 'refrigerator', 'book', 'clock', 'vase', 'scissors',
               'teddy bear', 'hair drier', 'toothbrush']

# define the test configuration
class TestConfig(Config):
     NAME = "test"
     GPU_COUNT = 1
     IMAGES_PER_GPU = 1
     NUM_CLASSES = 1 + 80

# define the model
rcnn = MaskRCNN(mode='inference', model_dir='./', config=TestConfig())
# load coco model weights
rcnn.load_weights('mask_rcnn_coco.h5', by_name=True)
# load photograph
img = load_img('elephant.jpg')
img = img_to_array(img)
# make prediction
results = rcnn.detect([img], verbose=0)
# get dictionary for first prediction
r = results[0]
# show photo with bounding boxes, masks, class labels and scores
display_instances(img, r['rois'], r['masks'], r['class_ids'], class_names, r['scores'])
Running the example shows the photograph of the elephant with the annotations predicted by the Mask R-CNN model, specifically:
- Bounding Box. Dotted bounding box around each detected object.
- Class Label. Class label assigned each detected object written in the top left corner of the bounding box.
- Prediction Confidence. Confidence of class label prediction for each detected object written in the top left corner of the bounding box.
- Object Mask Outline. Polygon outline for the mask of each detected object.
- Object Mask. Polygon fill for the mask of each detected object.
The result is very impressive and sparks many ideas for how such a powerful pre-trained model could be used in practice.
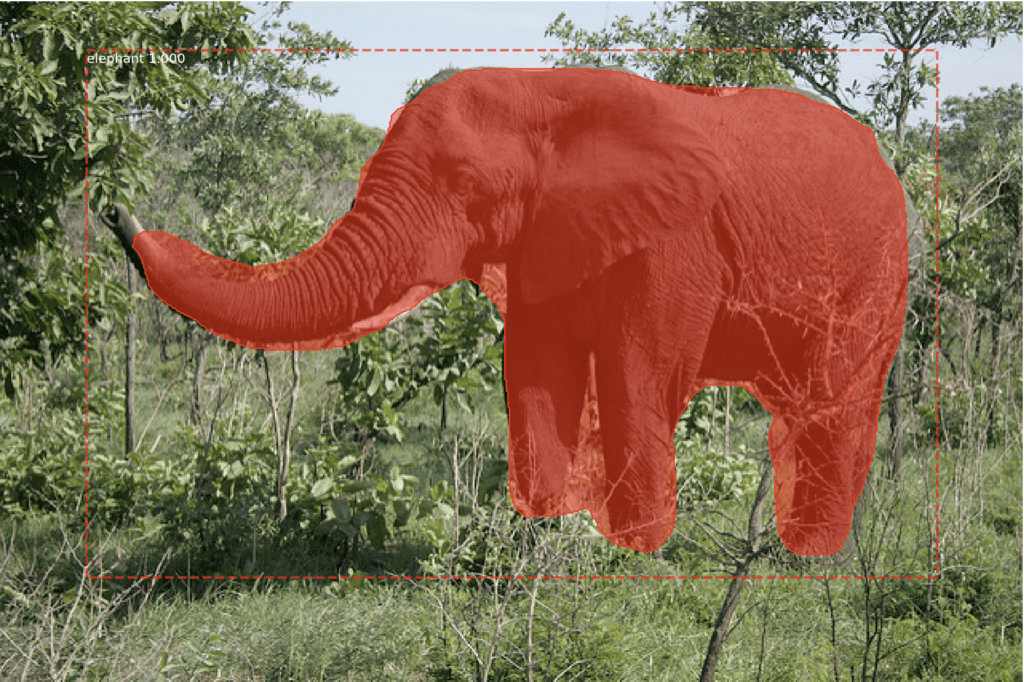
Photograph of an Elephant With All Objects Detected With a Bounding Box and Mask
Further Reading
This section provides more resources on the topic if you are looking to go deeper.
Papers
- Rich feature hierarchies for accurate object detection and semantic segmentation, 2013.
- Spatial Pyramid Pooling in Deep Convolutional Networks for Visual Recognition, 2014.
- Fast R-CNN, 2015.
- Faster R-CNN: Towards Real-Time Object Detection with Region Proposal Networks, 2016.
- Mask R-CNN, 2017.
API
Resources
R-CNN Code Repositories
- R-CNN: Regions with Convolutional Neural Network Features, GitHub.
- Fast R-CNN, GitHub.
- Faster R-CNN Python Code, GitHub.
- Detectron, Facebook AI, GitHub.
Summary
In this tutorial, you discovered how to use the Mask R-CNN model to detect objects in new photographs.
Specifically, you learned:
- The region-based Convolutional Neural Network family of models for object detection and the most recent variation called Mask R-CNN.
- The best-of-breed open source library implementation of the Mask R-CNN for the Keras deep learning library.
- How to use a pre-trained Mask R-CNN to perform object localization and detection on new photographs.
Do you have any questions?
Ask your questions in the comments below and I will do my best to answer.
The post How to Perform Object Detection in Photographs Using Mask R-CNN with Keras appeared first on Machine Learning Mastery.