
Author: Daniel Chung
Logging is a way to store information about your script and track events that occur. When writing any complex script in Python, logging is essential for debugging software as you develop it. Without logging, finding the source of a problem in your code may be extremely time consuming.
After completing this tutorial, you will know:
- Why we would like to use the logging module
- How to use the logging module
- How to customize the logging mechanism
Let’s get started.

Logging in Python
Photo by ilaria88. Some rights reserved.
Tutorial Overview
This tutorial is divided into four parts; they are:
- The benefits of logging
- Basic logging
- Advanced configuration to logging
- An example of the use of logging
Benefits of Logging
You may ask: “Why not just use printing?”
When you run an algorithm and want to confirm it is doing what you expected, it is natural to add some print() statements at strategic locations to show the program’s state. Printing can help debug simpler scripts, but as your code gets more and more complex, printing lacks the flexibility and robustness that logging has.
With logging, you can pinpoint where a logging call came from, differentiate severity between messages, and write information to a file, which printing cannot do. For example, we can turn on and off the message from a particular module of a larger program. We can also increase or decrease the verbosity of the logging messages without changing a lot of code.
Basic Logging
Python has a built-in library, logging, for this purpose. It is simple to create a “logger” to log messages or information that you would like to see.
The logging system in Python operates under a hierarchical namespace and different levels of severity. The Python script can create a logger under a namespace, and every time a message is logged, the script must specify its severity. The logged message can go to different places depending on the handler we set up for the namespace. The most common handler is to simply print on the screen, like the ubiquitous print() function. When we start the program, we may register a new handler and set up the level of severity to which the handler will react.
There are 5 different logging levels that indicate the severity of the logs, shown in increasing severity:
- DEBUG
- INFO
- WARNING
- ERROR
- CRITICAL
A very simple example of logging is shown below, using the default logger or the root logger:
import logging

logging.debug('Debug message')
logging.info('Info message')
logging.warning('Warning message')
logging.error('Error message')
logging.critical('Critical message')
These will emit log messages of different severity. While there are five lines of logging, you may see only three lines of output if you run this script, as follows:
WARNING:root:This is a warning message
ERROR:root:This is an error message
CRITICAL:root:This is a critical message
This is because the root logger, by default, only prints the log messages of a severity level of WARNING or above. However, using the root logger this way is not much different from using the print() function.
The settings for the root logger are not set in stone. We can configure the root logger to output to a particular file, change its default severity level, and format the output. Here’s an example:
import logging

logging.basicConfig(filename = 'file.log',
                    level = logging.DEBUG,
                    format = '%(asctime)s:%(levelname)s:%(name)s:%(message)s')

logging.debug('Debug message')
logging.info('Info message')
logging.warning('Warning message')
logging.error('Error message')
logging.critical('Critical message')
Running this script will produce no output to the screen but will have the following in the newly created file file.log:
2022-03-22 20:41:08,151:DEBUG:root:Debug message
2022-03-22 20:41:08,152:INFO:root:Info message
2022-03-22 20:41:08,152:WARNING:root:Warning message
2022-03-22 20:41:08,152:ERROR:root:Error message
2022-03-22 20:41:08,152:CRITICAL:root:Critical message
The call to logging.basicConfig() is to alter the root logger. In our example, we set the handler to output to a file instead of the screen, adjust the logging level such that all log messages of level DEBUG or above are handled, and also change the format of the log message output to include the time.
Note that now all five messages were output, so the default level that the root logger logs is now “DEBUG.” The log record attributes (such as %(asctime)s) that can be used to format the output can be found in the logging documentation.
Although there is a default logger, we usually want to make and use other loggers that can be configured separately. This is because we may want a different severity level or format for different loggers. A new logger can be created with:
logger = logging.getLogger("logger_name")
Internally, the loggers are organized in a hierarchy. A logger created with:
logger = logging.getLogger("parent.child")
will be a child logger created under the logger with the name “parent,” which, in turn, is under the root logger. Using a dot in the string signifies that the child logger is a child of the parent logger. In the above case, a logger with the name “parent.child” is created as well as one with the name "parent" implicitly.
Upon creation, a child logger has all the properties of its parent logger until reconfigured. We can demonstrate this with the following example:
import logging

# Create `parent.child` logger
logger = logging.getLogger("parent.child")

# Emit a log message of level INFO, by default this is not print to the screen
logger.info("this is info level")

# Create `parent` logger
parentlogger = logging.getLogger("parent")

# Set parent's level to INFO and assign a new handler
handler = logging.StreamHandler()
handler.setFormatter(logging.Formatter("%(asctime)s:%(name)s:%(levelname)s:%(message)s"))
parentlogger.setLevel(logging.INFO)
parentlogger.addHandler(handler)

# Let child logger emit a log message again
logger.info("this is info level again")
This code snippet will output only one line:
2022-03-28 19:23:29,315:parent.child:INFO:this is info level again
which is created by the StreamHandler object with the customized format string. It happens only after we reconfigured the logger for parent because otherwise, the root logger’s configuration prevails, and no messages at level INFO will be printed.
Advanced Configuration to Logging
As we saw in the last example, we can configure the loggers we made.
Threshold of Level
Like the basic configuration of the root logger, we can also configure the output destination, severity level, and formatting of a logger. The following is how we can set the threshold of the level of a logger to INFO:
parent_logger = logging.getLogger("parent")
parent_logger.setLevel(logging.INFO)
Now commands with severity level INFO and higher will be logged by the parent_logger. But if this is all you did, you will not see anything from parent_logger.info("messages") because there are no handlers assigned for this logger. In fact, there are no handlers for root logger as well unless you set up one with logging.basicConfig().
Log Handlers
We can configure the output destination of our logger with handlers. Handlers are responsible for sending the log messages to the correct destination. There are several types of handlers; the most common ones are StreamHandler and FileHandler. With StreamHandler, the logger will output to the terminal, while with FileHandler, the logger will output to a particular file.
Here’s an example of using StreamHandler to output logs to the terminal:
import logging

# Set up root logger, and add a file handler to root logger
logging.basicConfig(filename = 'file.log',
                    level = logging.WARNING,
                    format = '%(asctime)s:%(levelname)s:%(name)s:%(message)s')

# Create logger, set level, and add stream handler
parent_logger = logging.getLogger("parent")
parent_logger.setLevel(logging.INFO)
parent_shandler = logging.StreamHandler()
parent_logger.addHandler(parent_shandler)

# Log message of severity INFO or above will be handled
parent_logger.debug('Debug message')
parent_logger.info('Info message')
parent_logger.warning('Warning message')
parent_logger.error('Error message')
parent_logger.critical('Critical message')
In the code above, there are two handlers created: A FileHandler created by logging.basicConfig() for the root logger and a StreamHandler created for the parent logger.
Note that even though there is a StreamHandler that sends the logs to the terminal, logs from the parent logger are still being sent to file.log since it is a child of the root logger, and the root logger’s handler is also active for the child’s log messages. We can see that the logs to the terminal include INFO level messages and above:
Info message
Warning message
Error message
Critical message
But the output to the terminal is not formatted, as we have not used a Formatter yet. The log to file.log, however, has a Formatter set up, and it will be like the following:
2022-03-22 23:07:12,533:INFO:parent:Info message
2022-03-22 23:07:12,533:WARNING:parent:Warning message
2022-03-22 23:07:12,533:ERROR:parent:Error message
2022-03-22 23:07:12,533:CRITICAL:parent:Critical message
Alternatively, we can use FileHandler in the above example of parent_logger:
import logging

# Set up root logger, and add a file handler to root logger
logging.basicConfig(filename = 'file.log',
                    level = logging.WARNING,
                    format = '%(asctime)s:%(levelname)s:%(name)s:%(message)s')

# Create logger, set level, and add stream handler
parent_logger = logging.getLogger("parent")
parent_logger.setLevel(logging.INFO)
parent_fhandler = logging.FileHandler('parent.log')
parent_fhandler.setLevel(logging.WARNING)
parent_logger.addHandler(parent_fhandler)

# Log message of severity INFO or above will be handled
parent_logger.debug('Debug message')
parent_logger.info('Info message')
parent_logger.warning('Warning message')
parent_logger.error('Error message')
parent_logger.critical('Critical message')
The example above demonstrated that you can also set the level of a handler. The level of parent_fhandler filters out logs that are not WARNING level or higher. However, if you set the handler’s level to DEBUG, that would be the same as not setting the level because DEBUG logs would already be filtered out by the logger’s level, which is INFO.
In this case, the output to parent.log is:
Warning message
Error message
Critical message
while that of file.log is the same as before. In summary, when a log message is recorded by a logger,
- The logger’s level will determine if the message is severe enough to be handled. If the logger’s level is not set, the level of its parent (and ultimately the root logger) will be used for this consideration.
- If the log message will be handled, all handlers ever added along the logger hierarchy up to the root logger will receive a copy of the message. Each handler’s level will determine if this particular handler should honor this message.
Formatters
To configure the format of the logger, we use a Formatter. It allows us to set the format of the log, similarly to how we did so in the root logger’s basicConfig(). This is how we can add a formatter to our handler:
import logging

# Set up root logger, and add a file handler to root logger
logging.basicConfig(filename = 'file.log',
                    level = logging.WARNING,
                    format = '%(asctime)s:%(levelname)s:%(name)s:%(message)s')

# Create logger, set level, and add stream handler
parent_logger = logging.getLogger("parent")
parent_logger.setLevel(logging.INFO)
parent_fhandler = logging.FileHandler('parent.log')
parent_fhandler.setLevel(logging.WARNING)
parent_formatter = logging.Formatter('%(asctime)s:%(levelname)s:%(message)s')
parent_fhandler.setFormatter(parent_formatter)
parent_logger.addHandler(parent_fhandler)

# Log message of severity INFO or above will be handled
parent_logger.debug('Debug message')
parent_logger.info('Info message')
parent_logger.warning('Warning message')
parent_logger.error('Error message')
parent_logger.critical('Critical message')
First, we create a formatter, then set our handler to use that formatter. If we wanted to, we could make several different loggers, handlers, and formatters so that we could mix and match based on our preferences.
In this example, the parent.log will have:
2022-03-23 13:28:31,302:WARNING:Warning message
2022-03-23 13:28:31,302:ERROR:Error message
2022-03-23 13:28:31,303:CRITICAL:Critical message
and the file.log associated with the handler at root logger will have:
2022-03-23 13:28:31,302:INFO:parent:Info message
2022-03-23 13:28:31,302:WARNING:parent:Warning message
2022-03-23 13:28:31,302:ERROR:parent:Error message
2022-03-23 13:28:31,303:CRITICAL:parent:Critical message
Below is the visualization of the flow of loggers, handlers, and formatters from the documentation of the logging module:
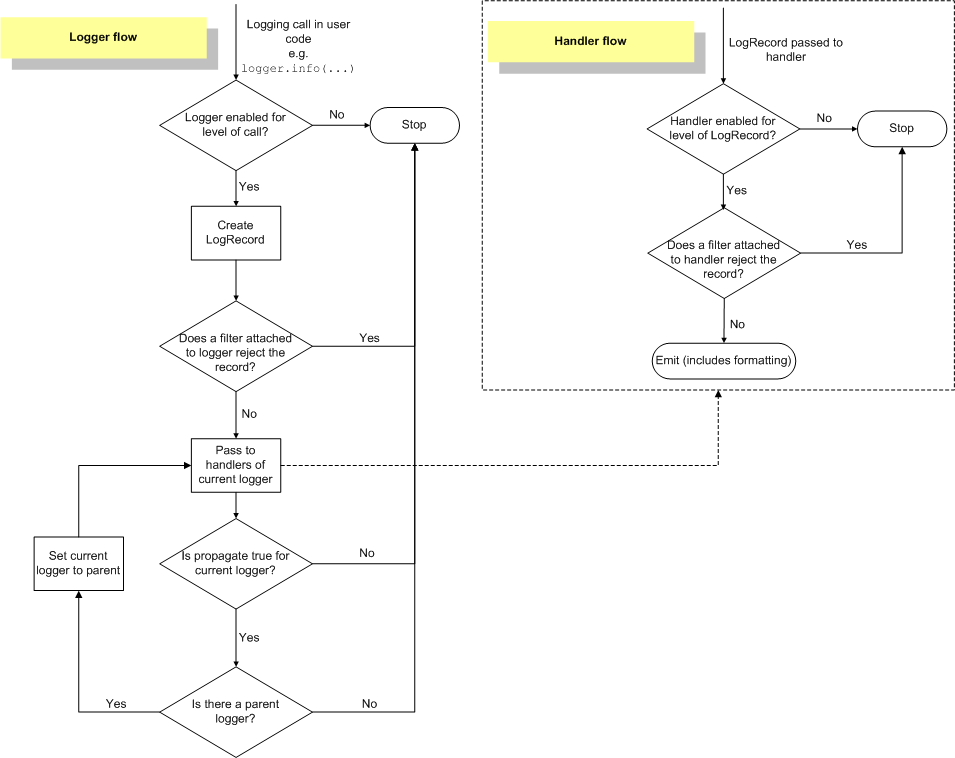
Flow chart of loggers and handlers in the logging module
An Example of the Use of Logging
Let’s consider the Nadam algorithm as an example:
# gradient descent optimization with nadam for a two-dimensional test function
from math import sqrt
from numpy import asarray
from numpy.random import rand
from numpy.random import seed

# objective function
def objective(x, y):
	return x**2.0 + y**2.0

# derivative of objective function
def derivative(x, y):
	return asarray([x * 2.0, y * 2.0])

# gradient descent algorithm with nadam
def nadam(objective, derivative, bounds, n_iter, alpha, mu, nu, eps=1e-8):
	# generate an initial point
	x = bounds[:, 0] + rand(len(bounds)) * (bounds[:, 1] - bounds[:, 0])
	score = objective(x[0], x[1])
	# initialize decaying moving averages
	m = [0.0 for _ in range(bounds.shape[0])]
	n = [0.0 for _ in range(bounds.shape[0])]
	# run the gradient descent
	for t in range(n_iter):
		# calculate gradient g(t)
		g = derivative(x[0], x[1])
		# build a solution one variable at a time
		for i in range(bounds.shape[0]):
			# m(t) = mu * m(t-1) + (1 - mu) * g(t)
			m[i] = mu * m[i] + (1.0 - mu) * g[i]
			# n(t) = nu * n(t-1) + (1 - nu) * g(t)^2
			n[i] = nu * n[i] + (1.0 - nu) * g[i]**2
			# mhat = (mu * m(t) / (1 - mu)) + ((1 - mu) * g(t) / (1 - mu))
			mhat = (mu * m[i] / (1.0 - mu)) + ((1 - mu) * g[i] / (1.0 - mu))
			# nhat = nu * n(t) / (1 - nu)
			nhat = nu * n[i] / (1.0 - nu)
			# x(t) = x(t-1) - alpha / (sqrt(nhat) + eps) * mhat
			x[i] = x[i] - alpha / (sqrt(nhat) + eps) * mhat
		# evaluate candidate point
		score = objective(x[0], x[1])
		# report progress
		print('>%d f(%s) = %.5f' % (t, x, score))
	return [x, score]

# seed the pseudo random number generator
seed(1)
# define range for input
bounds = asarray([[-1.0, 1.0], [-1.0, 1.0]])
# define the total iterations
n_iter = 50
# steps size
alpha = 0.02
# factor for average gradient
mu = 0.8
# factor for average squared gradient
nu = 0.999
# perform the gradient descent search with nadam
best, score = nadam(objective, derivative, bounds, n_iter, alpha, mu, nu)
print('Done!')
print('f(%s) = %f' % (best, score))
The simplest use case is to use logging to replace the print() function. We can make the following change: First, create a logger with the name nadam before we run any code and assign a StreamHandler:
...

import logging

...

# Added: Create logger and assign handler
logger = logging.getLogger("nadam")
handler  = logging.StreamHandler()
handler.setFormatter(logging.Formatter("%(asctime)s|%(levelname)s|%(name)s|%(message)s"))
logger.addHandler(handler)
logger.setLevel(logging.DEBUG)
# seed the pseudo random number generator
seed(1)
... # rest of the code
We must assign a handler because we never configured the root logger, and this would be the only handler ever created. Then, in the function nadam(), we re-create a logger nadam, but since it has already been set up, the level and handlers persisted. At the end of each outer for-loop in nadam(), we replaced the print() function with logger.info() so the message will be handled by the logging system:
...

# gradient descent algorithm with nadam
def nadam(objective, derivative, bounds, n_iter, alpha, mu, nu, eps=1e-8):
    # Create a logger
    logger = logging.getLogger("nadam")
    # generate an initial point
    x = bounds[:, 0] + rand(len(bounds)) * (bounds[:, 1] - bounds[:, 0])
    score = objective(x[0], x[1])
    # initialize decaying moving averages
    m = [0.0 for _ in range(bounds.shape[0])]
    n = [0.0 for _ in range(bounds.shape[0])]
    # run the gradient descent
    for t in range(n_iter):
        # calculate gradient g(t)
        g = derivative(x[0], x[1])
        # build a solution one variable at a time
        for i in range(bounds.shape[0]):
            # m(t) = mu * m(t-1) + (1 - mu) * g(t)
            m[i] = mu * m[i] + (1.0 - mu) * g[i]
            # n(t) = nu * n(t-1) + (1 - nu) * g(t)^2
            n[i] = nu * n[i] + (1.0 - nu) * g[i]**2
            # mhat = (mu * m(t) / (1 - mu)) + ((1 - mu) * g(t) / (1 - mu))
            mhat = (mu * m[i] / (1.0 - mu)) + ((1 - mu) * g[i] / (1.0 - mu))
            # nhat = nu * n(t) / (1 - nu)
            nhat = nu * n[i] / (1.0 - nu)
            # x(t) = x(t-1) - alpha / (sqrt(nhat) + eps) * mhat
            x[i] = x[i] - alpha / (sqrt(nhat) + eps) * mhat
        # evaluate candidate point
        score = objective(x[0], x[1])
        # report progress using logger
        logger.info('>%d f(%s) = %.5f' % (t, x, score))
    return [x, score]

...
If we are interested in the deeper mechanics of the Nadam algorithm, we may add more logs. The following is the complete code:
# gradient descent optimization with nadam for a two-dimensional test function
import logging
from math import sqrt
from numpy import asarray
from numpy.random import rand
from numpy.random import seed

# objective function
def objective(x, y):
    return x**2.0 + y**2.0

# derivative of objective function
def derivative(x, y):
    return asarray([x * 2.0, y * 2.0])

# gradient descent algorithm with nadam
def nadam(objective, derivative, bounds, n_iter, alpha, mu, nu, eps=1e-8):
    logger = logging.getLogger("nadam")
    # generate an initial point
    x = bounds[:, 0] + rand(len(bounds)) * (bounds[:, 1] - bounds[:, 0])
    score = objective(x[0], x[1])
    # initialize decaying moving averages
    m = [0.0 for _ in range(bounds.shape[0])]
    n = [0.0 for _ in range(bounds.shape[0])]
    # run the gradient descent
    for t in range(n_iter):
        iterlogger = logging.getLogger("nadam.iter")
        # calculate gradient g(t)
        g = derivative(x[0], x[1])
        # build a solution one variable at a time
        for i in range(bounds.shape[0]):
            # m(t) = mu * m(t-1) + (1 - mu) * g(t)
            m[i] = mu * m[i] + (1.0 - mu) * g[i]
            # n(t) = nu * n(t-1) + (1 - nu) * g(t)^2
            n[i] = nu * n[i] + (1.0 - nu) * g[i]**2
            # mhat = (mu * m(t) / (1 - mu)) + ((1 - mu) * g(t) / (1 - mu))
            mhat = (mu * m[i] / (1.0 - mu)) + ((1 - mu) * g[i] / (1.0 - mu))
            # nhat = nu * n(t) / (1 - nu)
            nhat = nu * n[i] / (1.0 - nu)
            # x(t) = x(t-1) - alpha / (sqrt(nhat) + eps) * mhat
            x[i] = x[i] - alpha / (sqrt(nhat) + eps) * mhat
            iterlogger.info("Iteration %d variable %d: mhat=%f nhat=%f", t, i, mhat, nhat)
        # evaluate candidate point
        score = objective(x[0], x[1])
        # report progress
        logger.info('>%d f(%s) = %.5f' % (t, x, score))
    return [x, score]

# Create logger and assign handler
logger = logging.getLogger("nadam")
handler  = logging.StreamHandler()
handler.setFormatter(logging.Formatter("%(asctime)s|%(levelname)s|%(name)s|%(message)s"))
logger.addHandler(handler)
logger.setLevel(logging.DEBUG)
logger = logging.getLogger("nadam.iter")
logger.setLevel(logging.INFO)
# seed the pseudo random number generator
seed(1)
# define range for input
bounds = asarray([[-1.0, 1.0], [-1.0, 1.0]])
# define the total iterations
n_iter = 50
# steps size
alpha = 0.02
# factor for average gradient
mu = 0.8
# factor for average squared gradient
nu = 0.999
# perform the gradient descent search with nadam
best, score = nadam(objective, derivative, bounds, n_iter, alpha, mu, nu)
print('Done!')
print('f(%s) = %f' % (best, score))
We prepared two level of loggers, nadam and nadam.iter, and set them in different levels. In the inner loop of nadam(), we use the child logger to print some internal variables. When you run this script, it will print the following:
2022-03-29 12:24:59,421|INFO|nadam.iter|Iteration 0 variable 0: mhat=-0.597442 nhat=0.110055
2022-03-29 12:24:59,421|INFO|nadam.iter|Iteration 0 variable 1: mhat=1.586336 nhat=0.775909
2022-03-29 12:24:59,421|INFO|nadam|>0 f([-0.12993798  0.40463097]) = 0.18061
2022-03-29 12:24:59,421|INFO|nadam.iter|Iteration 1 variable 0: mhat=-0.680200 nhat=0.177413
2022-03-29 12:24:59,421|INFO|nadam.iter|Iteration 1 variable 1: mhat=2.020702 nhat=1.429384
2022-03-29 12:24:59,421|INFO|nadam|>1 f([-0.09764012  0.37082777]) = 0.14705
2022-03-29 12:24:59,421|INFO|nadam.iter|Iteration 2 variable 0: mhat=-0.687764 nhat=0.215332
2022-03-29 12:24:59,421|INFO|nadam.iter|Iteration 2 variable 1: mhat=2.304132 nhat=1.977457
2022-03-29 12:24:59,421|INFO|nadam|>2 f([-0.06799761  0.33805721]) = 0.11891
...
2022-03-29 12:24:59,449|INFO|nadam.iter|Iteration 49 variable 0: mhat=-0.000482 nhat=0.246709
2022-03-29 12:24:59,449|INFO|nadam.iter|Iteration 49 variable 1: mhat=-0.018244 nhat=3.966938
2022-03-29 12:24:59,449|INFO|nadam|>49 f([-5.54299505e-05 -1.00116899e-03]) = 0.00000
Done!
f([-5.54299505e-05 -1.00116899e-03]) = 0.000001
Setting different loggers not only allows us to set a different level or handlers, but it also lets us differentiate where the log message comes from by looking at the logger’s name from the message printed.
In fact, one handy trick is to create a logging decorator and apply the decorator to some functions. We can keep track of every time that function is called. For example, we created a decorator below and applied it to the functions objective() and derivative():
...

# A Python decorator to log the function call and return value
def loggingdecorator(name):
    logger = logging.getLogger(name)
    def _decor(fn):
        function_name = fn.__name__
        def _fn(*args, **kwargs):
            ret = fn(*args, **kwargs)
            argstr = [str(x) for x in args]
            argstr += [key+"="+str(val) for key,val in kwargs.items()]
            logger.debug("%s(%s) -> %s", function_name, ", ".join(argstr), ret)
            return ret
        return _fn
    return _decor

# objective function
@loggingdecorator("nadam.function")
def objective(x, y):
    return x**2.0 + y**2.0

# derivative of objective function
@loggingdecorator("nadam.function")
def derivative(x, y):
    return asarray([x * 2.0, y * 2.0])
Then we will see the following in the log:
2022-03-29 13:14:07,542|DEBUG|nadam.function|objective(-0.165955990594852, 0.4406489868843162) -> 0.22171292045649288
2022-03-29 13:14:07,542|DEBUG|nadam.function|derivative(-0.165955990594852, 0.4406489868843162) -> [-0.33191198  0.88129797]
2022-03-29 13:14:07,542|INFO|nadam.iter|Iteration 0 variable 0: mhat=-0.597442 nhat=0.110055
2022-03-29 13:14:07,542|INFO|nadam.iter|Iteration 0 variable 1: mhat=1.586336 nhat=0.775909
2022-03-29 13:14:07,542|DEBUG|nadam.function|objective(-0.12993797816930272, 0.4046309737819536) -> 0.18061010311445824
2022-03-29 13:14:07,543|INFO|nadam|>0 f([-0.12993798  0.40463097]) = 0.18061
2022-03-29 13:14:07,543|DEBUG|nadam.function|derivative(-0.12993797816930272, 0.4046309737819536) -> [-0.25987596  0.80926195]
2022-03-29 13:14:07,543|INFO|nadam.iter|Iteration 1 variable 0: mhat=-0.680200 nhat=0.177413
2022-03-29 13:14:07,543|INFO|nadam.iter|Iteration 1 variable 1: mhat=2.020702 nhat=1.429384
2022-03-29 13:14:07,543|DEBUG|nadam.function|objective(-0.09764011794760165, 0.3708277653552375) -> 0.14704682419118062
2022-03-29 13:14:07,543|INFO|nadam|>1 f([-0.09764012  0.37082777]) = 0.14705
2022-03-29 13:14:07,543|DEBUG|nadam.function|derivative(-0.09764011794760165, 0.3708277653552375) -> [-0.19528024  0.74165553]
2022-03-29 13:14:07,543|INFO|nadam.iter|Iteration 2 variable 0: mhat=-0.687764 nhat=0.215332
...
where we can see the parameters and return values of each call to those two functions in the message logged by the nadam.function logger.
As we get more and more log messages, the terminal screen will become very busy. One way to make it easier to watch for issues is to highlight the logs in color with the colorama module. You need to have the module installed first:
pip install colorama
Here’s an example of how you can use the colorama module with the logging module to change your log colors and text brightness:
import logging
import colorama
from colorama import Fore, Back, Style

# Initialize the terminal for color
colorama.init(autoreset = True)

# Set up logger as usual
logger = logging.getLogger("color")
logger.setLevel(logging.DEBUG)
shandler = logging.StreamHandler()
formatter = logging.Formatter('%(asctime)s:%(levelname)s:%(name)s:%(message)s')
shandler.setFormatter(formatter)
logger.addHandler(shandler)

# Emit log message with color
logger.debug('Debug message')
logger.info(Fore.GREEN + 'Info message')
logger.warning(Fore.BLUE + 'Warning message')
logger.error(Fore.YELLOW + Style.BRIGHT + 'Error message')
logger.critical(Fore.RED + Back.YELLOW + Style.BRIGHT + 'Critical message')
From the terminal, you would see the following: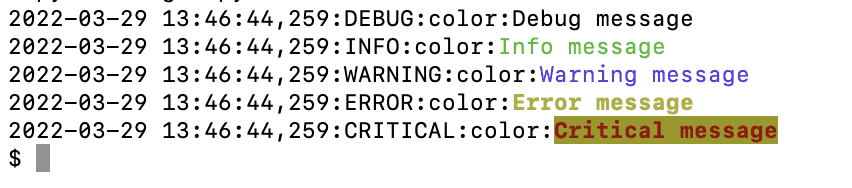
where the Fore, Back, and Style from the colorama module control the foreground, background, and brightness style of the text printed. This is leveraging the ANSI escape characters and works only on ANSI-supported terminals. Hence this is not suitable for logging to a text file.
In fact, we may derive the Formatter class with:
...
colors = {"DEBUG":Fore.BLUE, "INFO":Fore.CYAN,
          "WARNING":Fore.YELLOW, "ERROR":Fore.RED, "CRITICAL":Fore.MAGENTA}
class ColoredFormatter(logging.Formatter):
    def format(self, record):
        msg = logging.Formatter.format(self, record)
        if record.levelname in colors:
            msg = colors[record.levelname] + msg + Fore.RESET
        return msg
and use this instead of logging.Formatter. The following is how we can further modify the Nadam example to add color:
# gradient descent optimization with nadam for a two-dimensional test function
import logging
import colorama
from colorama import Fore

from math import sqrt
from numpy import asarray
from numpy.random import rand
from numpy.random import seed

def loggingdecorator(name):
    logger = logging.getLogger(name)
    def _decor(fn):
        function_name = fn.__name__
        def _fn(*args, **kwargs):
            ret = fn(*args, **kwargs)
            argstr = [str(x) for x in args]
            argstr += [key+"="+str(val) for key,val in kwargs.items()]
            logger.debug("%s(%s) -> %s", function_name, ", ".join(argstr), ret)
            return ret
        return _fn
    return _decor

# objective function
@loggingdecorator("nadam.function")
def objective(x, y):
    return x**2.0 + y**2.0

# derivative of objective function
@loggingdecorator("nadam.function")
def derivative(x, y):
    return asarray([x * 2.0, y * 2.0])

# gradient descent algorithm with nadam
def nadam(objective, derivative, bounds, n_iter, alpha, mu, nu, eps=1e-8):
    logger = logging.getLogger("nadam")
    # generate an initial point
    x = bounds[:, 0] + rand(len(bounds)) * (bounds[:, 1] - bounds[:, 0])
    score = objective(x[0], x[1])
    # initialize decaying moving averages
    m = [0.0 for _ in range(bounds.shape[0])]
    n = [0.0 for _ in range(bounds.shape[0])]
    # run the gradient descent
    for t in range(n_iter):
        iterlogger = logging.getLogger("nadam.iter")
        # calculate gradient g(t)
        g = derivative(x[0], x[1])
        # build a solution one variable at a time
        for i in range(bounds.shape[0]):
            # m(t) = mu * m(t-1) + (1 - mu) * g(t)
            m[i] = mu * m[i] + (1.0 - mu) * g[i]
            # n(t) = nu * n(t-1) + (1 - nu) * g(t)^2
            n[i] = nu * n[i] + (1.0 - nu) * g[i]**2
            # mhat = (mu * m(t) / (1 - mu)) + ((1 - mu) * g(t) / (1 - mu))
            mhat = (mu * m[i] / (1.0 - mu)) + ((1 - mu) * g[i] / (1.0 - mu))
            # nhat = nu * n(t) / (1 - nu)
            nhat = nu * n[i] / (1.0 - nu)
            # x(t) = x(t-1) - alpha / (sqrt(nhat) + eps) * mhat
            x[i] = x[i] - alpha / (sqrt(nhat) + eps) * mhat
            iterlogger.info("Iteration %d variable %d: mhat=%f nhat=%f", t, i, mhat, nhat)
        # evaluate candidate point
        score = objective(x[0], x[1])
        # report progress
        logger.warning('>%d f(%s) = %.5f' % (t, x, score))
    return [x, score]

# Prepare the colored formatter
colorama.init(autoreset = True)
colors = {"DEBUG":Fore.BLUE, "INFO":Fore.CYAN,
          "WARNING":Fore.YELLOW, "ERROR":Fore.RED, "CRITICAL":Fore.MAGENTA}
class ColoredFormatter(logging.Formatter):
    def format(self, record):
        msg = logging.Formatter.format(self, record)
        if record.levelname in colors:
            msg = colors[record.levelname] + msg + Fore.RESET
        return msg

# Create logger and assign handler
logger = logging.getLogger("nadam")
handler  = logging.StreamHandler()
handler.setFormatter(ColoredFormatter("%(asctime)s|%(levelname)s|%(name)s|%(message)s"))
logger.addHandler(handler)
logger.setLevel(logging.DEBUG)
logger = logging.getLogger("nadam.iter")
logger.setLevel(logging.DEBUG)
# seed the pseudo random number generator
seed(1)
# define range for input
bounds = asarray([[-1.0, 1.0], [-1.0, 1.0]])
# define the total iterations
n_iter = 50
# steps size
alpha = 0.02
# factor for average gradient
mu = 0.8
# factor for average squared gradient
nu = 0.999
# perform the gradient descent search with nadam
best, score = nadam(objective, derivative, bounds, n_iter, alpha, mu, nu)
print('Done!')
print('f(%s) = %f' % (best, score))
If we run it on a supporting terminal, we will see the following output:

Note that the colorful output can help us spot any abnormal behavior easier. Logging helps with debugging and also allows us to easily control how much detail we want to see by changing only a few lines of code.
Further Reading
This section provides more resources on the topic if you are looking to go deeper.
APIs
- logging module from Python standard library
- Colorama
Articles
Summary
In this tutorial, you learned how to implement logging techniques in your scripts.
Specifically, you learned:
- Basic and advanced logging techniques
- How to apply logging to a script and the benefits of doing so
The post Logging in Python appeared first on Machine Learning Mastery.