
Author: Muhammad Asad Iqbal Khan
Structuring the data pipeline in a way that it can be effortlessly linked to your deep learning model is an important aspect of any deep learning-based system. PyTorch packs everything to do just that.
While in the previous tutorial, we used simple datasets, we’ll need to work with larger datasets in real world scenarios in order to fully exploit the potential of deep learning and neural networks.
In this tutorial, you’ll learn how to build custom datasets in PyTorch. While the focus here remains only on the image data, concepts learned in this session can be applied to any form of dataset such as text or tabular datasets. So, here you’ll learn:
- How to work with pre-loaded image datasets in PyTorch.
- How to apply torchvision transforms on preloaded datasets.
- How to build custom image dataset class in PyTorch and apply various transforms on it.
Let’s get started.

Loading and Providing Datasets in PyTorch
Picture by Uriel SC. Some rights reserved.
Overview
This tutorial is in three parts; they are
- Preloaded Datasets in PyTorch
- Applying Torchvision Transforms on Image Datasets
- Building Custom Image Datasets
Preloaded Datasets in PyTorch
A variety of preloaded datasets such as CIFAR-10, MNIST, Fashion-MNIST, etc. are available in the PyTorch domain library. You can import them from torchvision and perform your experiments. Additionally, you can benchmark your model using these datasets.
We’ll move on by importing Fashion-MNIST dataset from torchvision. The Fashion-MNIST dataset includes 70,000 grayscale images in 28×28 pixels, divided into ten classes, and each class contains 7,000 images. There are 60,000 images for training and 10,000 for testing.
Let’s start by importing a few libraries we’ll use in this tutorial.
import torch
from torch.utils.data import Dataset
from torchvision import datasets
import torchvision.transforms as transforms
import numpy as np
import matplotlib.pyplot as plt
torch.manual_seed(42)
Let’s also define a helper function to display the sample elements in the dataset using matplotlib.
def imshow(sample_element, shape = (28, 28)):
    plt.imshow(sample_element[0].numpy().reshape(shape), cmap='gray')
    plt.title('Label = ' + str(sample_element[1]))
    plt.show()
Now, we’ll load the Fashion-MNIST dataset, using the function FashionMNIST() from torchvision.datasets. This function takes some arguments:
-
root: specifies the path where we are going to store our data. -
train: indicates whether it’s train or test data. We’ll set it to False as we don’t yet need it for training. -
download: set toTrue, meaning it will download the data from the internet. -
transform: allows us to use any of the available transforms that we need to apply on our dataset.
dataset = datasets.FashionMNIST(
    root='./data',
    train=False,
    download=True,
    transform=transforms.ToTensor()
)
Let’s check the class names along with their corresponding labels we have in the Fashion-MNIST dataset.
classes = dataset.classes
print(classes)
It prints
['T-shirt/top', 'Trouser', 'Pullover', 'Dress', 'Coat', 'Sandal', 'Shirt', 'Sneaker', 'Bag', 'Ankle boot']
Similarly, for class labels:
print(dataset.class_to_idx)
It prints
{'T-shirt/top': 0, 'Trouser': 1, 'Pullover': 2, 'Dress': 3, 'Coat': 4, 'Sandal': 5, 'Shirt': 6, 'Sneaker': 7, 'Bag': 8, 'Ankle boot': 9}
Here is how we can visualize the first element of the dataset with its corresponding label using the helper function defined above.
imshow(dataset[0])
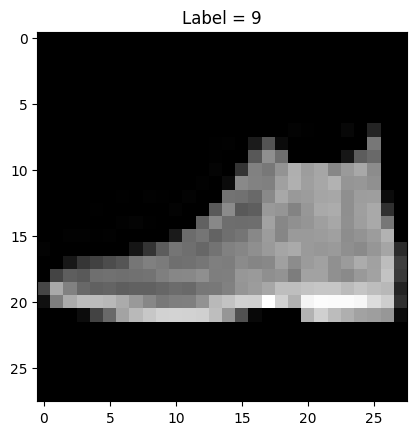
First element of the Fashion MNIST dataset
Applying Torchvision Transforms on Image Datasets
In many cases, we’ll have to apply several transforms before feeding the images to neural networks. For instance, a lot of times we’ll need to RandomCrop the images for data augmentation.
As you can see below, PyTorch enables us to choose from a variety of transforms.
print(dir(transforms))
This shows all available transform functions:
['AugMix', 'AutoAugment', 'AutoAugmentPolicy', 'CenterCrop', 'ColorJitter',
 'Compose', 'ConvertImageDtype', 'ElasticTransform', 'FiveCrop', 'GaussianBlur',
'Grayscale', 'InterpolationMode', 'Lambda', 'LinearTransformation',
'Normalize', 'PILToTensor', 'Pad', 'RandAugment', 'RandomAdjustSharpness',
'RandomAffine', 'RandomApply', 'RandomAutocontrast', 'RandomChoice', 'RandomCrop',
'RandomEqualize', 'RandomErasing', 'RandomGrayscale', 'RandomHorizontalFlip',
'RandomInvert', 'RandomOrder', 'RandomPerspective', 'RandomPosterize',
'RandomResizedCrop', 'RandomRotation', 'RandomSolarize', 'RandomVerticalFlip',
'Resize', 'TenCrop', 'ToPILImage', 'ToTensor', 'TrivialAugmentWide',
...]
As an example, let’s apply the RandomCrop transform to the Fashion-MNIST images and convert them to a tensor. We can use transform.Compose to combine multiple transforms as we learned from the previous tutorial.
randomcrop_totensor_transform = transforms.Compose([transforms.CenterCrop(16),
                                                    transforms.ToTensor()])
dataset = datasets.FashionMNIST(root='./data',
                                train=False, download=True,
                                transform=randomcrop_totensor_transform)
print("shape of the first data sample: ", dataset[0][0].shape)
This prints
shape of the first data sample: torch.Size([1, 16, 16])
As you can see image has now been cropped to $16times 16$ pixels. Now, let’s plot the first element of the dataset to see how they have been randomly cropped.
imshow(dataset[0], shape=(16, 16))
This shows the following image
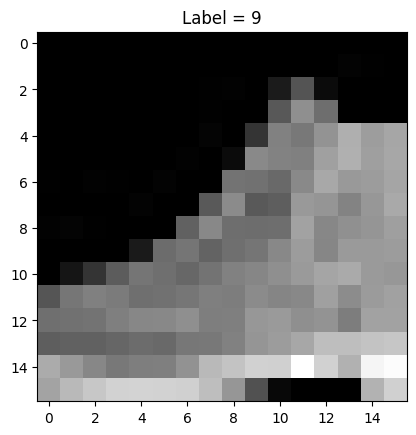
Cropped image from Fashion MNIST dataset
Putting everything together, the complete code is as follows:
import torch
from torch.utils.data import Dataset
from torchvision import datasets
import torchvision.transforms as transforms
import numpy as np
import matplotlib.pyplot as plt
torch.manual_seed(42)

def imshow(sample_element, shape = (28, 28)):
    plt.imshow(sample_element[0].numpy().reshape(shape), cmap='gray')
    plt.title('Label = ' + str(sample_element[1]))
    plt.show()

dataset = datasets.FashionMNIST(
    root='./data',
    train=False,
    download=True,
    transform=transforms.ToTensor()
)

classes = dataset.classes
print(classes)
print(dataset.class_to_idx)

imshow(dataset[0])

randomcrop_totensor_transform = transforms.Compose([transforms.CenterCrop(16),
                                                    transforms.ToTensor()])
dataset = datasets.FashionMNIST(
    root='./data',
    train=False,
    download=True,
    transform=randomcrop_totensor_transform)
)

print("shape of the first data sample: ", dataset[0][0].shape)
imshow(dataset[0], shape=(16, 16))
Building Custom Image Datasets
Until now we have been discussing prebuilt datasets in PyTorch, but what if we have to build a custom dataset class for our image dataset? While in the previous tutorial we only had a simple overview about the components of the Dataset class, here we’ll build a custom image dataset class from scratch.
Firstly, in the constructor we define the parameters of the class. The __init__ function in the class instantiates the Dataset object. The directory where images and annotations are stored is initialized along with the transforms if we want to apply them on our dataset later. Here we assume we have some images in a directory structure like the following:
attface/
|-- imagedata.csv
|-- s1/
|   |-- 1.png
|   |-- 2.png
|   |-- 3.png
|   ...
|-- s2/
|   |-- 1.png
|   |-- 2.png
|   |-- 3.png
|   ...
...
and the annotation is a CSV file like the following, located under the root directory of the images (i.e., “attface” above):
s1/1.png,1
s1/2.png,1
s1/3.png,1
...
s12/1.png,12
s12/2.png,12
s12/3.png,12
where the first column of the CSV data is the path to the image and the second column is the label.
Similarly, we define the __len__ function in the class that returns the total number of samples in our image dataset while the __getitem__ method reads and returns a data element from the dataset at a given index.
import os
import pandas as pd
import numpy as np
from torchvision.io import read_image

# creating object for our image dataset
class CustomDatasetForImages(Dataset):
    # defining constructor
    def __init__(self, annotations, directory, transform=None):
        # directory containing the images
        self.directory = directory
        annotations_file_dir = os.path.join(self.directory, annotations)
        # loading the csv with info about images
        self.labels = pd.read_csv(annotations_file_dir)
        # transform to be applied on images
        self.transform = transform

        # Number of images in dataset
        self.len = self.labels.shape[0]

    # getting the length
    def __len__(self):
        return len(self.labels)

    # getting the data items
    def __getitem__(self, idx):
        # defining the image path
        image_path = os.path.join(self.directory, self.labels.iloc[idx, 0])
        # reading the images
        image = read_image(image_path)
        # corresponding class labels of the images
        label = self.labels.iloc[idx, 1]

        # apply the transform if not set to None
        if self.transform:
            image = self.transform(image)

        # returning the image and label
        return image, label
Now, we can create our dataset object and apply the transforms on it. We assume the image data are located under the directory named “attface” and the annotation CSV file is at “attface/imagedata.csv”. Then the dataset is created as follows:
directory = "attface"
annotations = "imagedata.csv"
custom_dataset = CustomDatasetForImages(annotations=annotations,
                                        directory=directory)
Optionally, you can add the transform function to the dataset as well:
randomcrop_totensor_transform = transforms.RandomCrop(16)
dataset = CustomDatasetForImages(annotations=annotations,
                                 directory=directory,
                                 transform=randomcrop_totensor_transform)
You can use this custom image dataset class to any of your datasets stored in your directory and apply the transforms for your requirements.
Summary
In this tutorial, you learned how to work with image datasets and transforms in PyTorch. Particularly, you learned:
- How to work with pre-loaded image datasets in PyTorch.
- How to apply torchvision transforms on pre-loaded datasets.
- How to build custom image dataset class in PyTorch and apply various transforms on it.
The post Loading and Providing Datasets in PyTorch appeared first on MachineLearningMastery.com.